Related posts are a great way to make sure that people stay on your website longer. They present posts or other content that the reader might enjoy based on the post they’re already reading.
But, if you’ve noticed, that’s now a core block, nor is it really an option to set up with the Query Loop block.
Nor should it be in WordPress core. It’s something that is pretty clearly in plugin territory, in my opinion.
So when creating the Crosswinds Blocks plugin, I knew this was a block that I needed to include in the first version. And I also knew that it needed to be as customizable as the Query Loop block to give the user complete control over how it looked on their site.
This is how I was able to build that perfect related posts block.
What the Need Was
I love displaying related posts at the end of all of my blog posts.
I think they are a great way to help readers find content that they might be interested in and keep them around on the website longer. When done right, it’s mutually beneficial to both parties.
But when I was switching my main website over to a block theme, I found that adding that related posts functionality wasn’t as easy as it had been.
So as someone who doesn’t like just looking for a plugin to do something (unless it’s really challenging), I set out to create a related posts block that I could use for my own website and others could use for their website.
The Plan for Creating the Block
The plan for the Related Posts block seemed simple at the outset.
For the front end of the block, I would simply take what I had done with the Single Content block, adjust the query so that it got a number of related posts chosen by the user and then add in support for a grid view if the user wanted it.
But the back end soon became more of a challenge.
I wanted it to behave like the post template block, where a user could make a change with one post and have it change the rest of them. And, like the post template block, I wanted the user to have full control over how the posts were displayed.
So it was time for a road trip to the post template block in the Gutenberg GitHub repository.
Diving into the Query Loop and Post Template Blocks
I figured that the post template block was probably going to be my best bet when it came to figuring out how to craft the Related Posts block how I wanted it to look. It was basically what I had in mind when planning out this block anyway.
But jumping into the edit.js file for the post template block was quite the experience. I have some experience with React, but at the time it was mostly the simple stuff. I knew how components worked and had a limited knowledge of how state worked in React.
But things like memo were completely out of my league, to be honest. It really took a while to be able to parse what all was going on in that file. And trying to figure out how to bring that over to the Related Posts block.
Of course, there was always one option…
Building the Edit Part of the Block
I’m going to be completely honest, I basically took what the post template block is doing and put it into the edit.js file for the Related Posts block.
At the time, I wasn’t super comfortable with the more complicated side of React, so it seemed like a simple copy and paste was the best bet. Fortunately, I now know enough about how React works to know what’s all going on in the code.
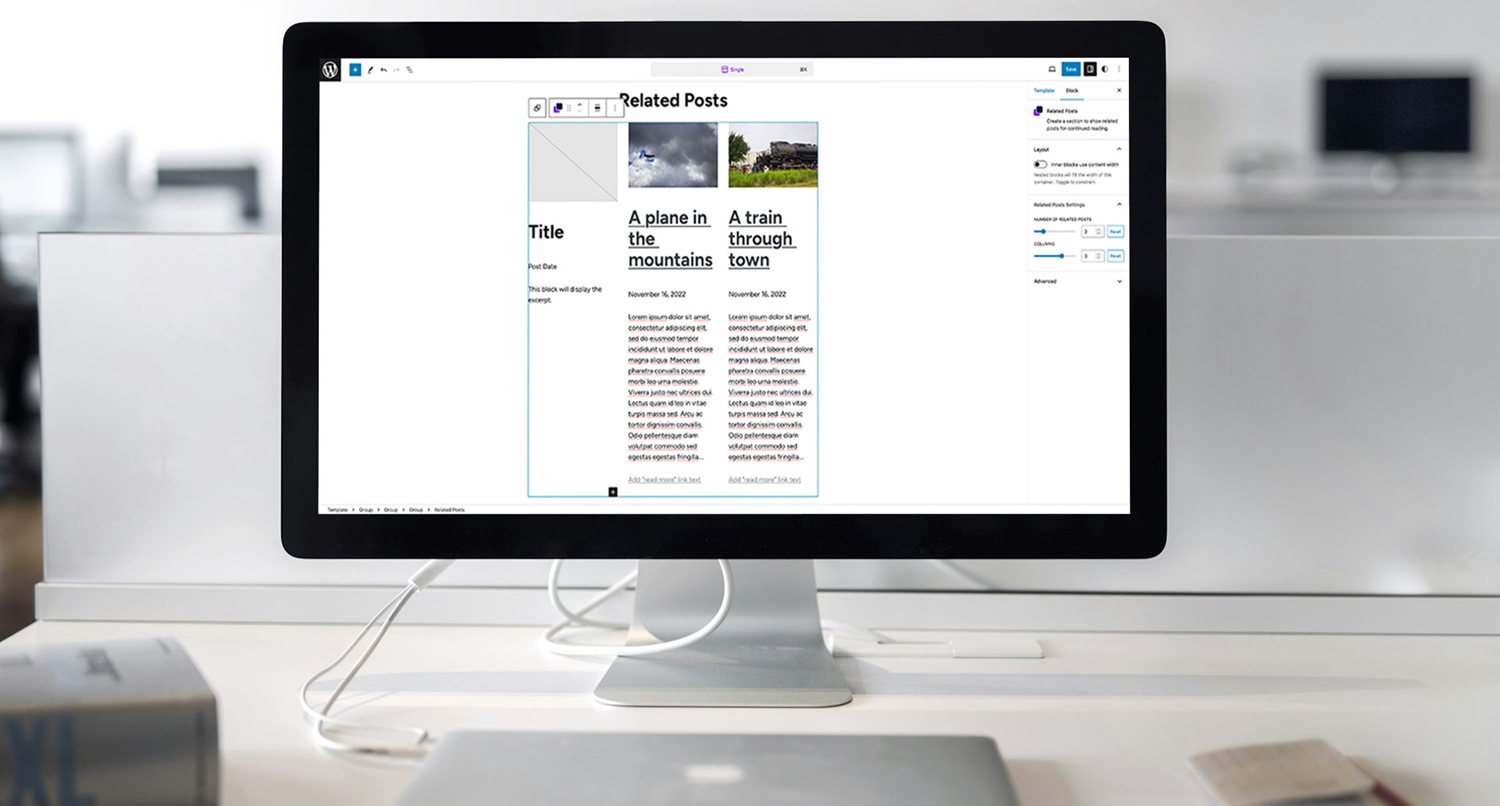
Anyway, I then added in two settings to the inspector column. The first controls the number of related posts that are shown. And the other controls the number of columns that are displayed in the section.
And thankfully that was enough to get the editor side of the block working.
Displaying the Block on the Front End
As I mentioned before, the front end proved to be the easiest part of the process.
I was basically able to take the PHP template file from the Single Content block and drop it right into the Related Posts block.
From there, I simply adjusted the query so that it would pull related posts based on the tags of the current post and in a random order versus just a specific post. And then for styling, I just had to add in a class for the number of columns a user wanted for the block and then add in the styling for the possible column numbers.
After that, it was ready for showtime!
Extending the Block for All Post Types
The first version of the Related Posts block worked perfectly for posts. But if you used it on a different post type, it wouldn’t work.
So with Crosswinds Blocks 1.1, I wanted to change that.
On the surface it seemed like an easy enough change. After all, I only had to make sure that the post type that was being selected in the query was based on the post type of the single template.
But the reality was more challenging. Because the block also used the tags for the post to select the related posts, I was going to have to make sure that it used a taxonomy for the given post type instead. And how would I be able to code that for every possible post type and taxonomy combination out there.
Instead, I decided to give the user that power.
I ended up adding in settings to the plugin’s settings screen where a user could choose what taxonomy would be used for the block for each post type. And then I could just use that option in the PHP template for the block to get the right content.
All in all, once I had the planning part figured out, it was pretty easy to implement.
Where the Block Goes from Here
So, where exactly does the Related Posts block go from here?
To be honest, I think it’s pretty much done. It’s in a place where it should work for any situation a user needs for their website. I might add in some extra patterns for it. And I would like to find a way to make a heading display only if there are actually related posts.
But all things considered, those are relatively low priority at the moment.
I’m just glad I was able to find a way to make this work pretty perfectly on the first try.